3.7 Configuring MyID to issue passkeys using Microsoft Entra
To configure and enable this feature in MyID, you must:
-
Set up the allowed origins in the MyID web.oauth2 settings.
-
Set up an external system to communicate with the FIDO system.
-
Create a credential profile for your FIDO devices.
3.7.1 Setting up the allowed origins
To allow MyID to perform attestation checks on a newly created FIDO credential with an origin that is not the MyID server, you must configure the MyID web.oauth2 settings to list the allowed origins for FIDO devices; this is the list of domains that are allowed to authenticate. You must include your MyID web server domain and the Microsoft domain.
To configure the server settings for multiple origins:
-
On the MyID web server, open the appsettings.Production.json file in a text editor.
By default, this is:
C:\Program Files\Intercede\MyID\web.oauth2\appsettings.Production.json
This file is the override configuration file for the appsettings.json file for the web service. If this file does not already exist, you must create it in the same folder as the appsettings.json file.
-
Edit the file to include the following:
Copy{
"Fido":{
"Config":{
"Origins":["https://<server>", "https://login.microsoft.com"]
}
}
}where:
-
<server> – the name of the MyID web server.
Important: The Origins option is case sensitive, and must be consistent with the casing of the DNS Name in the web server's TLS certificate.
-
- Save the appsettings.Production.json file.
-
Recycle the web service app pool:
- On the MyID web server, in Internet Information Services (IIS) Manager, select Application Pools.
- Right-click the myid.web.oauth2.pool application pool, then from the pop-up menu click Recycle.
This ensures that the web service has picked up the changes to the configuration file.
Note: If Origins is specified, it overrides any value in Origin.
3.7.2 Setting the MyID Client Service timeout
When you attempt to collect an externally-linked FIDO credential, if you have not already opened the MyID Client Service, the browser displays a pop-up asking you to open the MyID Client Suite (which contains the MyID Client Service required to collect the FIDO credential).
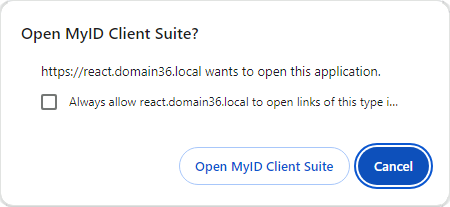
The browser waits ten seconds (by default) for you to click the option.
If the MyID Client Service does not run by the end of the timeout period, the browser displays the following error:
-
OA10087 – The MyID client service encountered an issue while attempting to register your device with an external source.
If you want to change this timeout, you can configure the web.oauth2 settings file.
Note: This setting affects the timeout only when collecting externally-linked FIDO credentials; it does not affect the behavior of the pop-up in other circumstances.
To change the MyID Client Service timeout:
-
On the MyID web server, open the appsettings.Production.json file in a text editor.
By default, this is:
C:\Program Files\Intercede\MyID\web.oauth2\appsettings.Production.json
This file is the override configuration file for the appsettings.json file for the web service. If this file does not already exist, you must create it in the same folder as the appsettings.json file.
-
Edit the MyID section to include the following:
Copy{
"MyID": {
"MaxCheckAliveTimeMs": <timeout>
}where:
-
<timeout> – the number of milliseconds to wait for the user to open the MyID Client Suite.
-
- Save the appsettings.Production.json file.
-
Recycle the web service app pool:
- On the MyID web server, in Internet Information Services (IIS) Manager, select Application Pools.
- Right-click the myid.web.oauth2.pool application pool, then from the pop-up menu click Recycle.
This ensures that the web service has picked up the changes to the configuration file.
3.7.3 Setting up the external system
You must set up an external system to allow MyID to communicate with the FIDO system.
To configure a new FIDO Entra external system:
-
In MyID Desktop, from the Configuration category, select External Systems.
You can also launch this workflow from the Connections and Notifications section of the More category in the MyID Operator Client. See the Using Connections and Notifications workflows section in the MyID Operator Client guide for details.
-
Click New.
-
From the Listener Type drop-down list, select FIDOService.
The details for a FIDO external system appear.

-
Complete the following details:
-
Name – Type the name of the external system.
Take a note of this name; you use the external system name to identify the appropriate external system when you configure the credential profile for FIDO devices.
-
Description – Type a description for the external system.
-
Enabled – Select this option to enable the external system, or deselect it to disable the external system. When the external system is disabled, MyID does not attempt to communicate with the external system.
-
Mapping File – Select RESTFidoEntra.
The contents of the RESTFidoEntra.xml file are displayed. When you select this file, an additional option appears on screen: External Entra Reference.
-
API Location – Type the URL of the FIDO service API.
For the beta version of the Entra passkey service, use:
https://graph.microsoft.com/beta
Once the feature has been released, change this to:
https://graph.microsoft.com/v1.0
You can check the status of the API at the Microsoft website:
learn.microsoft.com/en-us/graph/api/resources/fido2authenticationmethod?view=graph-rest-beta
-
OAuth Token Endpoint – Type the location of the OAuth token endpoint.
You can include the Entra tenant ID in this URL, or you can include a placeholder that MyID substitutes for the value in the Tenant ID field; for example:
https://login.microsoftonline.com/{TenantID}/oauth2/v2.0/token
-
Client ID – Type the client identifier for the FIDO service.
-
Requested Scopes – Type the scopes that must be granted to the bearer token for the FIDO service.
-
Tenant ID – Type the ID of the tenant to be used for the FIDO service. This value is substituted for {TenantID} in the OAuth Token Endpoint.
-
External Entra Reference – select the field in the vPeopleUserAccounts view in the MyID database in which you want to store the Entra ObjectGUID for the user. By default, MyID uses the XuSYSExternalReferenceId1 field. Select one of the following options:
-
XuSYSExternalReferenceId1
-
XuSYSExternalReferenceId2
-
XuSYSExternalReferenceId3
-
UserPrincipalName
If you select an option other than XuSYSExternalReferenceId1, you must make sure that you have stored the Entra ID in the appropriate field (for example, using the Self-Service Request Portal, the MyID Operator Client, the MyID Core API, or directly in the database).
-
-
Client Secret – Type the client secret to use when authenticating to the FIDO service.
-
Confirm Client Secret – Confirm the client secret to use when authenticating to the FIDO service.
-
-
Click Save.

3.7.4 Creating a credential profile for passkeys
Once you have configured your external system, you can create a credential profile for passkeys that use this external system. See section 5.2, Setting up a passkey credential profile for the Self-Service Request Portal.